

You can manage or disconnect your data source at any time from Settings.
Every integration filters your traffic the same way: only requests from known AI crawlers and agents are stored; all other traffic is discarded at ingest. See the supported AI bots below.
AWS CloudFront
Peec AI deploys a CloudFormation stack into your AWS account. The stack receives your CloudFront access logs, filters them for AI crawler traffic, and forwards the matching entries to Peec automatically. You’ll need permission to deploy CloudFormation stacks, plus your CloudFront Distribution ID(s).- Select your AWS region in Peec.
- Click Open in AWS Console. A CloudFormation quick-create page opens with all parameters pre-filled.
- Deploy the stack. This usually takes 1 to 2 minutes.
- Back in Peec, enter your CloudFront Distribution ID(s), comma-separated if you have several.
Google Cloud CDN
Peec AI generates a one-line setup command pre-filled with your credentials. Running it configures a Cloud Logging sink and deploys a Cloud Function that filters your CDN access logs and forwards AI crawler traffic to Peec. You’ll need a GCP project with permission to enable APIs, create Pub/Sub topics, and deploy Cloud Functions, plus your Cloud Load Balancer URL map name.- Select your GCP region in Peec.
- Copy the generated setup command.
- Run it in your terminal or Google Cloud Shell. The script asks for your Cloud Load Balancer URL map name, then completes setup and activates the integration.
Cloudflare
Peec AI uses your Cloudflare API token to deploy a Worker to your selected zone. The Worker captures AI crawler requests in real time and forwards them to Peec without affecting your site’s response times.Create an API token
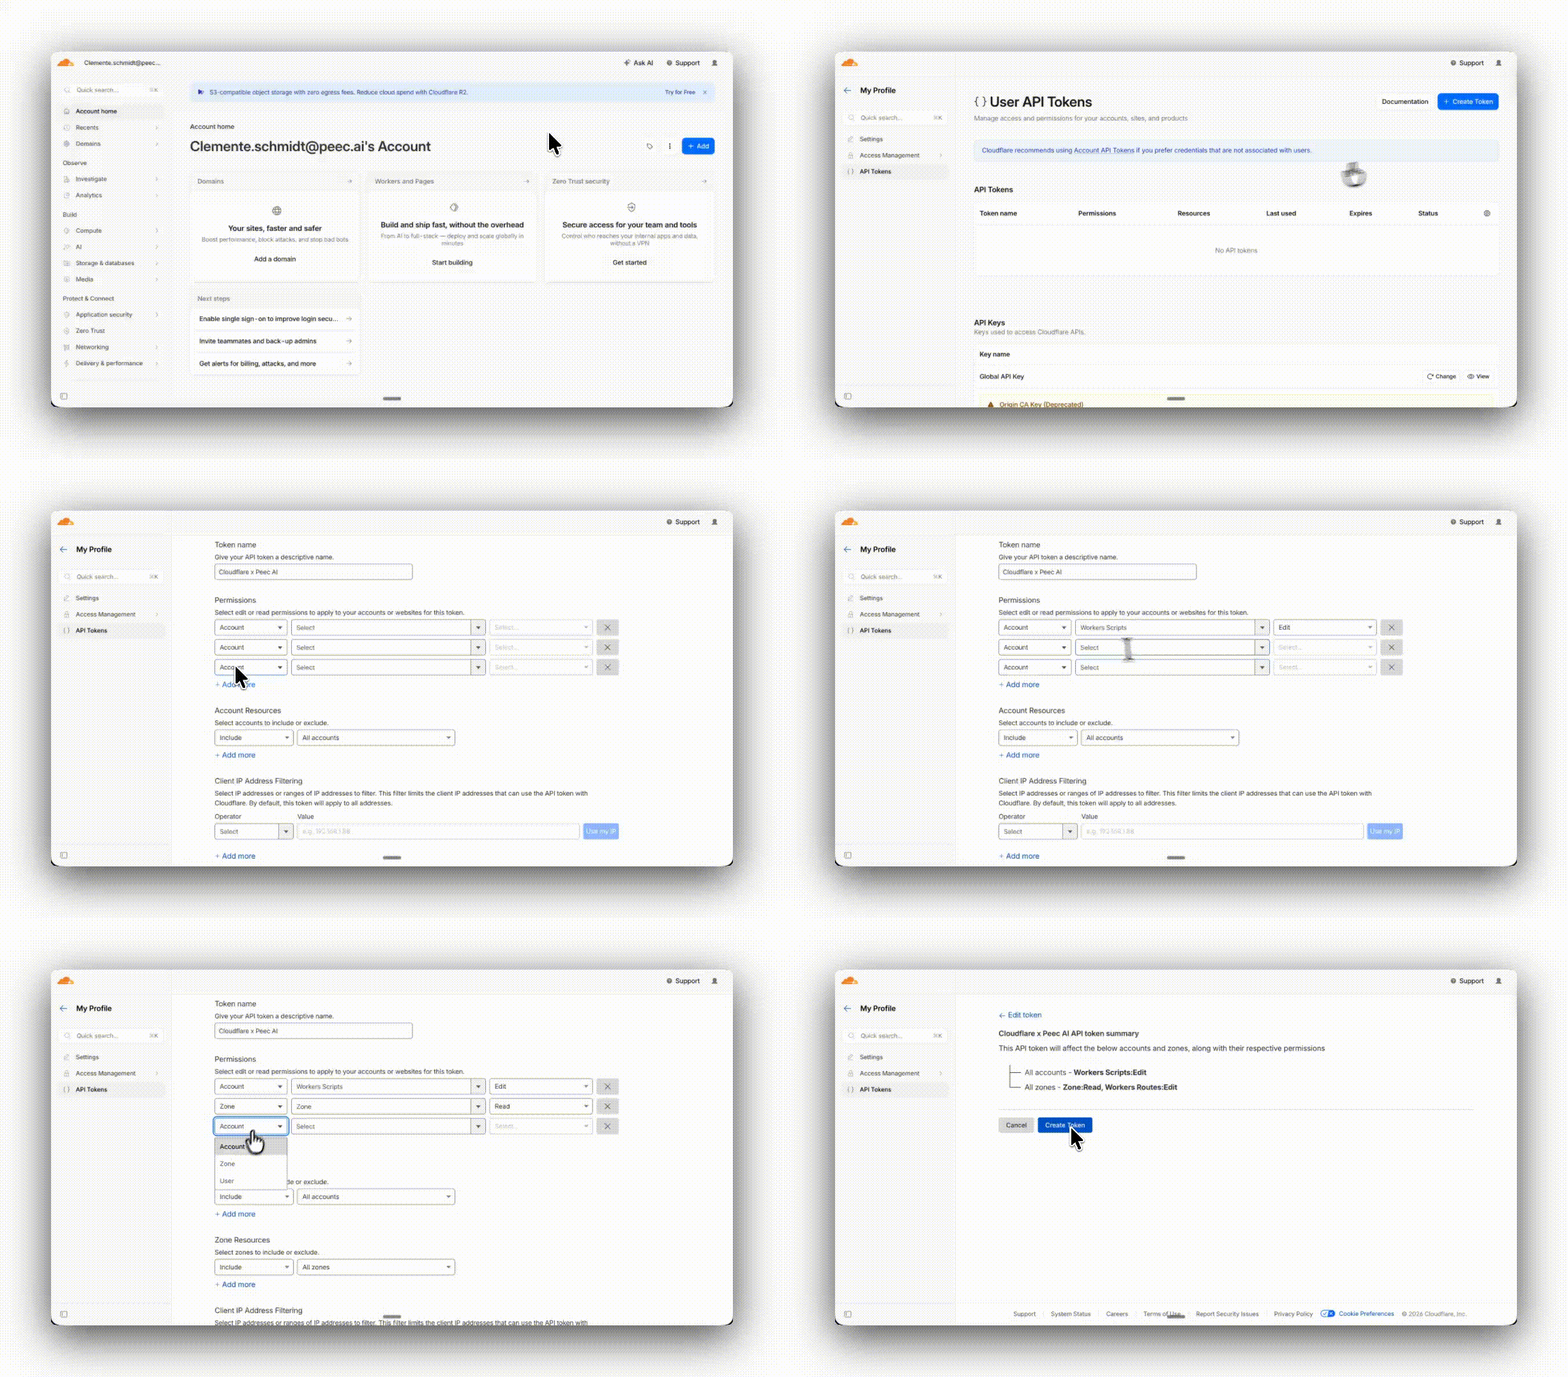
- Navigate to your profile in Cloudflare
- Select API Tokens from the left-hand panel
- Select Create Token and click on Get Started (the first option)
- Give your token a name
- Add three permission fields by clicking on Add More under the permission section. From there, you need to add in this order:
- Workers Scripts > Edit
- Zone > Zone > Read
- Zone > Workers Routes > Edit
- No need to edit anything else; you can continue to the summary and click on Create Token
Deploy the Worker
- Enter your Cloudflare API token in Peec and press Enter to validate it.
- Select your Zone from the dropdown.
- Click Deploy worker.
Cloudflare Worker limits
When you connect through Cloudflare Workers, every request your site receives, including from AI bots, counts toward your Workers request quota. All Cloudflare accounts include the Workers Free plan by default, which allows up to 100,000 requests per day and resets daily. This limit applies regardless of your Cloudflare site plan, because Business and Enterprise site plans are separate from the Workers plan. On high-traffic sites, this limit can be reached quickly. Once the limit is hit, two things can happen:- Peec stops receiving log data: For the remainder of that day, Peec stops receiving any log data coming from your domain, resulting in gaps in your Crawl Insights.
- Errors to visitors: Cloudflare routes requests to Fail Closed by default, meaning that once the limit is hit, Cloudflare serves a 1027 error page instead of your site.
- Enable minimum safeguard: In your Cloudflare dashboard, set the route mode to Fail Open. Your site will remain accessible to visitors, though data collection will still be paused for the rest of the day.
- Upgrade to a Workers Paid plan: The Workers Paid plan removes the daily request cap, ensuring uninterrupted log ingestion and continuous data in Crawl Insights. You can find Cloudflare’s pricing page for details.
Vercel
Peec AI uses a Vercel Account API token (a personal access token, not an AI Gateway key) to create a Log Drain on your selected team. Vercel streams access logs directly to Peec, where they’re filtered for AI crawler traffic. You’ll need an API token generated from your Vercel account, with access to the team you want to monitor.- In Vercel, go to Account Settings → Tokens (vercel.com/account/tokens) and create a token. (Do not use a key from AI Gateway → API Keys, that’s a separate credential for calling AI models and won’t work here.)
- Enter your Vercel API token in Peec and press Enter to validate it.
- Select your Team from the dropdown.
- Select the Projects to monitor, or choose All projects.
- Click Deploy drain.
WordPress
Peec AI generates a WordPress plugin pre-configured with your organization’s credentials. Once activated, the plugin logs AI crawler visits to Peec without impacting your site’s performance. It skips internal WordPress paths (health checks, admin AJAX, cron) and correctly identifies visitor IPs when your site sits behind a proxy or CDN.- Click Download plugin in Peec. A
.zipfile is generated with your credentials embedded. - In your WordPress admin panel, go to Plugins → Add New → Upload Plugin.
- Upload the
.zipfile and click Activate Plugin.
Akamai
Peec AI uses your Akamai EdgeGrid credentials to create a DataStream via the Akamai API. The stream delivers access logs to Peec every 30 seconds. You’ll need the EdgeGrid credentials from your.edgerc file: Host, Client Token, Client Secret, and Access Token.
- Enter your Akamai EdgeGrid credentials in Peec and press Enter to validate them.
- Select a Group from the dropdown.
- Select the Properties to monitor.
- Click Deploy DataStream.
Generic webhook
If your provider isn’t listed above, you can send logs to Peec yourself. Peec AI gives you a webhook endpoint and an API key. You configure your own system, whether that’s a CDN, log shipper, reverse proxy, or custom application, to POST access log batches to the endpoint. Peec validates each payload and keeps the AI crawler traffic.- Click Generate API Key in Peec.
- Click Reserve API Key to lock it in.
- Copy the Webhook URL and required headers.
- Configure your system to POST log batches to the endpoint.
- Click Confirm webhook deployment.
Regenerating the API key invalidates the previous one. Update your sender configuration before switching keys.
Endpoint
Required headers
Request body
Send an array of log objects, with a maximum of 500 entries per request.File upload
To analyze a specific time period, or if you’d rather not set up a live connection, upload a log file directly from your browser. Peec parses the file, finds the AI crawler entries, and imports them into your dashboard.- Drag and drop your log file (
.csvor CLF.log), or browse for it. - For CLF files, enter your domain (e.g.
example.com) when prompted, so Peec can build full URLs from the request paths. - Peec processes the file and shows how many AI bot requests it found.
- Click Upload to import them. A progress bar tracks completion.
CSV format
Column order doesn’t matter:
Example: